Wednesday, September 26, 2012

"Seize the Chocolate" Card

I love the "Girlfriends" series stamps by Art Impressions. So when I was asked to make a thank you card for a recipient who had gifted a variety of chocolates and sweets, I jumped at the chance to use the "Girlfriends" My Favorite Things set! I dove into my "favorite things" basket and pulled out this gem from scrappy-go-lucky. It is one of my favorite blogs and their use of copic markers is inspiring.

Unfortunately, I do not have copic markers. I'm still a budget scrapper and inking is very new to me so I haven't had the extra money to start that collection (yet). However, I have colored pencils and an inexpensive set of markers. After admiring Tereesa's, I just had to give it a try and here is the result. . .
Not bad, if I do say so myself. I love Tereesa's store front and I drool over her use of colors! But I also really like the embossing I did for my awning and store. I did feel like my store lacked a little definition and just before dropping off the card, I grabbed a pen out of my car and drew a few lines. It looked really good, but I didn't have time to snap a picture of the final product.

On the inside of the card, the shelf of sweets slightly overlaps the window because I wanted it to look like they were right in the window. The sweets are covered in stickles, so they look delicious up close and the shelf is lined with an enamel gel I found at Michael's.

I love the embossed pattern on this page. I think it looks like wallpaper a boutique would use. Cutting the sweets out was a little tricky and took some patience. But. . . I can't wait to do it all again!!!
The shelf and the sentiment were both popped up using the thinnest foam adhesives I own. I popped up the sentiment at the top of the page so that the card closed the same distance at the top and bottom.
The sender of the card hand wrote:


The treats were yummy!
You were so "sweet" to think of me.

This one was really fun to make.

Wednesday, September 19, 2012

A Gift Set

TA-DA! I finished a card gift set that was recreated from My Pink Stamper site and using Create-A-Critter cartridge. Along the way, I learned that I LOVE glitter! I used it on all but one card. 

I stamped all the envelopes with a coordinating ink color to give them a more cohesive look.

The moo-volous card came straight from one of the idea's that was included in a Pink Stamper stamp pack I purchased.
I believe this little 'stinker' is my favorite. I love his little face which I did with a stamp set from Peachy Keen Stamps.
Love the polka dot paper so much. . . that I had to use it again!

Then I packed them all into a clear photo box and finished it off with a band of paper and monogrammed it with the first initial for the person I intend it for. 

For the band, I used the Mini Monograms and Storybook cartridges. Then I finished up the B with lots of glitter! I know she's really going to enjoy these cards.

Glitter is grrrreat!!! (I'm channelling my inner Tony the Tiger) 

Wednesday, September 12, 2012

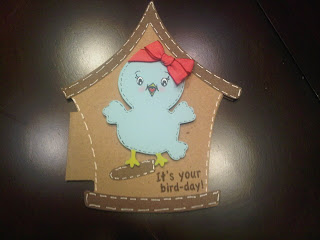
Birds of a Feather

Hello!

This is a project I pulled from my files. These three cards are a gift pack I gave to my MIL. I believe all three cards came from two of my favorite blogs My Pink Stamper and My Creative Time. 
I recreated the cards in my Cricut Design Studio, so I can just recut them when needed.
The plan is to make 2 other bird themed cards. I think 5 cards will make a nice gift set.

My Pink Stamper is the very first blog I stumbled upon back in 2008 and I still follow her today. Robyn has an inspiring personality that shows through her site. She has wonderful videos that are great for beginners and seasoned scrappers alike. Oh and I love her stamps! I used them on these cards. I just learned that production will halt as she will shift her focus to family and create for fun - I'm so happy for her! 

Have a 'tweet' day!

Wednesday, September 5, 2012

Sweet Summer Garden Brunch

Over the summer, I helped plan a ladies brunch.  It was quick and simple - but, oh, so much fun!  We set up the tables in her sunroom so we had lots of light from all the windows. 
My mom wanted to host a brunch for the neighborhood ladies and she asked if I could do it in a Summer Garden style.  She wanted a sit-down, bright and cheerful meal for 10-12 people.  Plus, she had a very small budget, but my thriftyness (I'm sure it's a word) is so competative I was determined to come in under budget!
My mom loves green.  So I built up on a green table cloth.  I used a bamboo type runner down the middle and the small daisy flower bouquet (blocked by the glass in this picture - oops) is in a wooden block.  The table was a mix of gold, silver, green and bright colors of summer.   She really likes the mix of country and glass.  
The table setting was little summer bugs like the butterfly, dragonfly, bee and lady bug in this plate.  I rotated 4 different center plates that were designed in the same theme.  Some where more colorful than others and this one was the most subtle pattern.
To play off the plates, I used my Cricut to cut butterflies and hung them on water glasses as place settings.  I saw a similar idea on Etsy (just google place settings or butterflies and several will pop up).  Using the Cricut Craft Room, I picked a butterfly with a shape that appeared to give it a lot of movement and welded some of the edges for the effect I was looking for.  Then I wrote the guests name in the top right corner.  Easy Peasy.
 
I love fresh flowers and these had just been delivered to the grocery store when we was there shopping for the food.  They were so bright and cheery - they just had to go home with us.  I tucked them in a metal watering can and repeated the look with another one in the center of the dining table.
 
Did I mention my mom loves green.  And I love green mums.  Unfortunately, they only had one itty bitty bunch of green mums.  So I mixed with them with white and set them on a side table.
This little guy is my favorite.  He looks a little grumpy.  But its hard not to smile at him with the daisy and green mums popping out of his top.  It looks like he's having a bad hair day.  Maybe that's why he's so grumpy.        I can totally relate. 
On this table I put potatoes and an assortment of sweets and breads including orange cinnimon rolls (potatoes and sweets are not pictures).  I used the large muffin tin from William Sonoma with 3 different shapes and I baked 3 different flavors in their own shape.  Wish I had a close up of the muffins, they were super cute (I need to work on the picture taking).
This is the fruit and juices station.  The cranberry was delicious.  There was another station for coffee and tea, but I was so busy chatting once people started arriving that I didn't get around to taking pictures of that side of the room. 
 
Also, we asked a friend who also happens to be a chef to make omelets.  It was a great budget-friendly item that everyone got to make to order.  The chef came wearing his chefs jacket and all, but I didn't get his picture.  :(   I'm seeing a pattern here. . . . need to work on the picture thing.  LOL!
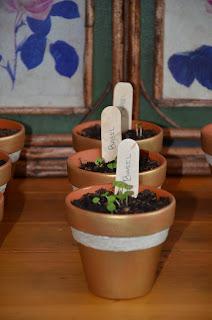
The favors were Sweet basil grown from seedlings. I got the idea from a wedding I attended where they handed out seedling trees for all the guests to plant. I thought this was a nice fit for a Summer theme and it turns out Sweet Basil is an excellent herb for omelets.  I used 3" pots, painted them with a light coat of gold (I wanted the terracotta color to shine through a little so they weren't too shiny), and glued a little twine around the top.  I took large popsicle sticks, broke them in half so I would have a place to write the herbs name.
The favors looked nice lined up in rows and since it was near the door it was easy for the guests to take one as they were leaving. And under a $1 for each, I'm very satisfied with these little beauties!