Friday, February 1, 2013

Valentine's Day Mailboxes

A quick google search for mini-mailboxes will yield pages and pages of people who have made these super simple and adorable little mailboxes for Valentines' Day.
(I borrowed this picture from another site because I forgot to take pictures of mine pre-decorated.)
You can find them in the $1 bin at Target as early as Christmas and through the month of January. Last year they had pink, red and white. They are small - about 4 1\2 inches long.
I made these for my nieces and nephew last year. I simply wrapped the body of the mailbox in paper and made a simple LOVE stamp for the flag.

I used my Cricut to cut out their initials and glued it to the front of the lid. For the two girls, I used the pink mailboxes and wrapped the monogram in pink ribbon. 

For my nephew's box, I used a red mailbox, a more boy-ish/blue and red patterned paper and a simple monogram. I couldn't resist adding a little ribbon to his flag!
Then I filled them all with candy - everyone got hugs, kisses, sweet tarts and chocolate goodies (I may have ate a few hugs and kisses while making them - yum. . . chocolate.)
My nephew got EXTREME sour heart-shaped tarts.
The girls got heart-candy rings.
Rumor has it this year Target has metallic silver and pink! Bummer because I still have a whole bag of these left over from last year. Maybe I'll scoot over to Target and buy just one or two of the new ones. After all I can use these for Christmas, birthdays, get well packages, to welcome a new neighbor . . . the possibilities are endless.

Happy Valentine's Day!

Wednesday, October 10, 2012

60th Birthday Gag Gift

My mom's best friend is turning 60. Happy Birthday, Sherry! (Although this post will be sometime after her birthday - I'm such a procrastinator.)

Here is a little of the back story: My mom's mother (my grandmother) and Sherry's mother were friends and neighbors, so my mom and Sherry grew up together. And her daughter and I grew up knowing each other. So, this birthday feels not only like a celebration of her life, but also their 60 years long friendship.

Guests of her party have been asked to bring a gag gift. After a little shopping, I couldn't bring myself to buy the normal over-the-hill gift. The birthday girl is a sophisticated, beautiful lady. So I decided to make her a book of "tools" for those over 60 to fit the gag-gift theme but stuff she could reuse.

This is what I came up with: (forgive the pictures - I am using my camera phone and the lighting is terrible).

I purchased the book at TJ Max. It is a large, over-sized book that feels a little like leather. I made the letters. I will come back to those.
This is the side view of the book. It has a texture and look of gold leafed pages.

The book is actually a box. It is lined with a soft fabric. I purchased items and added tags with cute little sayings I found on a website for over-the-hill games. Also, I added a funny certificate of maturity to the inside of the lid with the birthday girl's name and birthday, but I don't have a picture of it.
To make the tags, I used paper that coordinated with the color of the book. I then used the same paper to make the letters on the book. The first layer is a salmon color that I cut with Nestabilities and then embossed for a raised edge. I inked the edges in brown.
I typed sayings in a Word document with my desired font. I picked a fancy font to go with the traditional feel of the gift. Then I printed them on cream cardstock (close up it looks a little like antique paper). I used an oval Nestiability that would fit nicely over the bottom layer to cut out the sayings. I also inked the cream, oval paper in brown.
I punched holes in the tags and used brown ribbon from Michael's sale bin and tied the tags to all the items. I found these cute sayings on a website years ago, and unfortunately I've forgotten exactly where. . . . My favorite is the magnifying glass. It says "To help you see the fine print now that your eyesight isn't what it use to be." I made the print smaller and smaller so that the magnifying glass was needed to read the last part "what it use to be."
An over-sized paper clip in pink. Sometime ago I saw a paperclip that was actually a large silver paper weight. That is what I wanted but could not find one in time for the party, so I purchased this one at Walmart in a pack of 4 for about $2.00. Also Joann Fabric's has an over-sized wooden clothes hanger that I believe would be really cute!
The tag says "because sometimes it's hard to hold it all together as you get older"
Marbles "for when you lose yours" and Mints "so you can remember all the things you're "mint" to do"

I couldn't find Gummy Teeth that I liked so I left this out of the box. I did have a Balloon "to hold the hot air you're full of." It's not pictured because we got it the day of the party. I purchased a tiny balloon, had it blown up just enough so it would fit in the box when closed. I had a vision that it would float out of the box when it opened, but there wasn't enough helium so it wouldn't float. (I'll know better next time!)
I cut the letters from Storybook Cricut cartridge using Cricut Design Studio (the Craft Room wasn't up and running yet) with the same cardstock as for the bottom layer of the tags. Using brown ink and a natural sponge, I inked the sides and front of the letters to give them an aged look. (Unfortunately my camera doesn't do them justice!)
I adhered the letters with my ATG gun. I ran the adhesive over my finger and kind-of balled it up and stuck it to the letters. I wanted the letters to be removable so she can use the book in the future.
In the end, I decided to cover the top of the letters with Glossy Accents. It made the letters look and feel like part of the book. Can you see how they shine and reflect the light just like the cover of the book does.
It was a hoot watching her open it and go through all the items!

HAPPY BIRTHDAY!!!

Wednesday, October 3, 2012

Picture to Chalkboard


Confession time.  My memory is terrible.  I'm all the time leaving myself little reminder notes.  I have a special drawer in the kitchen that holds pieces of paper and a pen, so I can quickly grab them to jot down what I need to do.  Problem is those little pieces of paper get lost, fly off into the unknown and usually disappear only for me to find them weeks later  (side note - I think the one to blame for stealing my notes is the little person who lives in our dryer and steals our socks.)  Anywho. . .  this small issue gave me a reason to make one of those DIY Chalkboards I keep seeing all over the Internet.  I have a large blank wall in my kitchen right next to the pantry that would be perfect for a chalkboard to keep up with all those lists of things I need to buy and do.
 
So, of course, I hit the thrift stores to find a large mirror that I could convert.  What I found was a large picture.  The frame is the right size and lightweight, so it would be easy to hang. 
 
It's current placement of the hanging wire thingy (very technical words here) wasn't going the right direction, but I'm sure I can fix that. 

 I liked that the back of the picture - it looked so nice and put together. 

My local hardware store had the chalkboard paint in a spray can and a paint can.  I *heart* spray paint and I figured it would go on the glass smoother than a brush/paint.  The man behind the counter insisted I needed primer and some of the sites I did my "research" said the same but you'll see a little on down the page that it didn't work out so well for me. 
I decided to take the back off because I thought it would be faster and easier to remove the glass and spray paint it (I was looking for a short-cut).  This didn't work out so well for me either.
The glass wouldn't come out easily and I feared breaking or chipping it, so I put all the cardboard stuff back in.  Now I don't have my pretty back anymore (insert sad face). 
Here I am taping it up to protect the frame from the spray paint.  So much for trying to save some time - not that this project took very much time.
I put the picture on a drop cloth in the garage and sprayed it with the primer. 
Remember my primer problem I mentioned earlier? . . .  well, right after I put a coat of chalkboard spray on, it started peeling.  Good news!  It peeled off in one big strip.  Very easy clean up.  But I had to start over - gggrrr! 
Using fine sandpaper, I went all over the glass scratching it up.  Although it didn't look like I had done much of anything.  The glass looked unharmed for the most part.  But I sprayed on the chalkboard paint anyway - NO PRIMER this time.  And you know what?   

It worked like a charm.  Here it is drying against the wall where I will hang it.  You can kinda see the bottom of a small picture frame I will be replacing with this large chalkboard.  Plus I redid the wire hangin' thingy so the chalkboard would hang the way I wanted.

Then I rub, rub rubbed the board with a sideways piece of chalk.  - - - you can kinda seem my aprons hanging on the door.  My favorite is the one with pink flowers and ruffles.
Now that the chalkboard is done, I can do away with all those tiny pieces of paper. 
 
 
What I learned - - -  the primer isn't necessary and I wish I would have left the pretty back on.  Not that it matters because only I know the backing isn't there.  Also, I need to wipe the board down with a wet cloth.  Although these pictures make it look difficult to read, in person it really looks fine. 
 
I'll definitely do this project again.  It was super easy.  It would be nice to have a super funky frame here, something really interesting.  Now that I know I can do this, I'll keep an eye out for the perfect frame.  

Wednesday, September 26, 2012

"Seize the Chocolate" Card

I love the "Girlfriends" series stamps by Art Impressions. So when I was asked to make a thank you card for a recipient who had gifted a variety of chocolates and sweets, I jumped at the chance to use the "Girlfriends" My Favorite Things set! I dove into my "favorite things" basket and pulled out this gem from scrappy-go-lucky. It is one of my favorite blogs and their use of copic markers is inspiring.

Unfortunately, I do not have copic markers. I'm still a budget scrapper and inking is very new to me so I haven't had the extra money to start that collection (yet). However, I have colored pencils and an inexpensive set of markers. After admiring Tereesa's, I just had to give it a try and here is the result. . .
Not bad, if I do say so myself. I love Tereesa's store front and I drool over her use of colors! But I also really like the embossing I did for my awning and store. I did feel like my store lacked a little definition and just before dropping off the card, I grabbed a pen out of my car and drew a few lines. It looked really good, but I didn't have time to snap a picture of the final product.

On the inside of the card, the shelf of sweets slightly overlaps the window because I wanted it to look like they were right in the window. The sweets are covered in stickles, so they look delicious up close and the shelf is lined with an enamel gel I found at Michael's.

I love the embossed pattern on this page. I think it looks like wallpaper a boutique would use. Cutting the sweets out was a little tricky and took some patience. But. . . I can't wait to do it all again!!!
The shelf and the sentiment were both popped up using the thinnest foam adhesives I own. I popped up the sentiment at the top of the page so that the card closed the same distance at the top and bottom.
The sender of the card hand wrote:


The treats were yummy!
You were so "sweet" to think of me.

This one was really fun to make.

Wednesday, September 19, 2012

A Gift Set

TA-DA! I finished a card gift set that was recreated from My Pink Stamper site and using Create-A-Critter cartridge. Along the way, I learned that I LOVE glitter! I used it on all but one card. 

I stamped all the envelopes with a coordinating ink color to give them a more cohesive look.

The moo-volous card came straight from one of the idea's that was included in a Pink Stamper stamp pack I purchased.
I believe this little 'stinker' is my favorite. I love his little face which I did with a stamp set from Peachy Keen Stamps.
Love the polka dot paper so much. . . that I had to use it again!

Then I packed them all into a clear photo box and finished it off with a band of paper and monogrammed it with the first initial for the person I intend it for. 

For the band, I used the Mini Monograms and Storybook cartridges. Then I finished up the B with lots of glitter! I know she's really going to enjoy these cards.

Glitter is grrrreat!!! (I'm channelling my inner Tony the Tiger) 

Wednesday, September 12, 2012

Birds of a Feather

Hello!

This is a project I pulled from my files. These three cards are a gift pack I gave to my MIL. I believe all three cards came from two of my favorite blogs My Pink Stamper and My Creative Time. 
I recreated the cards in my Cricut Design Studio, so I can just recut them when needed.
The plan is to make 2 other bird themed cards. I think 5 cards will make a nice gift set.

My Pink Stamper is the very first blog I stumbled upon back in 2008 and I still follow her today. Robyn has an inspiring personality that shows through her site. She has wonderful videos that are great for beginners and seasoned scrappers alike. Oh and I love her stamps! I used them on these cards. I just learned that production will halt as she will shift her focus to family and create for fun - I'm so happy for her! 

Have a 'tweet' day!

Wednesday, September 5, 2012

Sweet Summer Garden Brunch

Over the summer, I helped plan a ladies brunch.  It was quick and simple - but, oh, so much fun!  We set up the tables in her sunroom so we had lots of light from all the windows. 
My mom wanted to host a brunch for the neighborhood ladies and she asked if I could do it in a Summer Garden style.  She wanted a sit-down, bright and cheerful meal for 10-12 people.  Plus, she had a very small budget, but my thriftyness (I'm sure it's a word) is so competative I was determined to come in under budget!
My mom loves green.  So I built up on a green table cloth.  I used a bamboo type runner down the middle and the small daisy flower bouquet (blocked by the glass in this picture - oops) is in a wooden block.  The table was a mix of gold, silver, green and bright colors of summer.   She really likes the mix of country and glass.  
The table setting was little summer bugs like the butterfly, dragonfly, bee and lady bug in this plate.  I rotated 4 different center plates that were designed in the same theme.  Some where more colorful than others and this one was the most subtle pattern.
To play off the plates, I used my Cricut to cut butterflies and hung them on water glasses as place settings.  I saw a similar idea on Etsy (just google place settings or butterflies and several will pop up).  Using the Cricut Craft Room, I picked a butterfly with a shape that appeared to give it a lot of movement and welded some of the edges for the effect I was looking for.  Then I wrote the guests name in the top right corner.  Easy Peasy.
 
I love fresh flowers and these had just been delivered to the grocery store when we was there shopping for the food.  They were so bright and cheery - they just had to go home with us.  I tucked them in a metal watering can and repeated the look with another one in the center of the dining table.
 
Did I mention my mom loves green.  And I love green mums.  Unfortunately, they only had one itty bitty bunch of green mums.  So I mixed with them with white and set them on a side table.
This little guy is my favorite.  He looks a little grumpy.  But its hard not to smile at him with the daisy and green mums popping out of his top.  It looks like he's having a bad hair day.  Maybe that's why he's so grumpy.        I can totally relate. 
On this table I put potatoes and an assortment of sweets and breads including orange cinnimon rolls (potatoes and sweets are not pictures).  I used the large muffin tin from William Sonoma with 3 different shapes and I baked 3 different flavors in their own shape.  Wish I had a close up of the muffins, they were super cute (I need to work on the picture taking).
This is the fruit and juices station.  The cranberry was delicious.  There was another station for coffee and tea, but I was so busy chatting once people started arriving that I didn't get around to taking pictures of that side of the room. 
 
Also, we asked a friend who also happens to be a chef to make omelets.  It was a great budget-friendly item that everyone got to make to order.  The chef came wearing his chefs jacket and all, but I didn't get his picture.  :(   I'm seeing a pattern here. . . . need to work on the picture thing.  LOL!
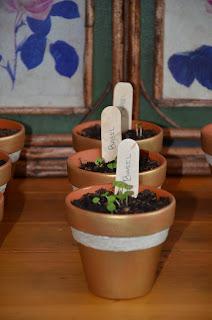
The favors were Sweet basil grown from seedlings. I got the idea from a wedding I attended where they handed out seedling trees for all the guests to plant. I thought this was a nice fit for a Summer theme and it turns out Sweet Basil is an excellent herb for omelets.  I used 3" pots, painted them with a light coat of gold (I wanted the terracotta color to shine through a little so they weren't too shiny), and glued a little twine around the top.  I took large popsicle sticks, broke them in half so I would have a place to write the herbs name.
The favors looked nice lined up in rows and since it was near the door it was easy for the guests to take one as they were leaving. And under a $1 for each, I'm very satisfied with these little beauties!